Guide to Rising Damp


What is Rising Damp / Salt Damp?
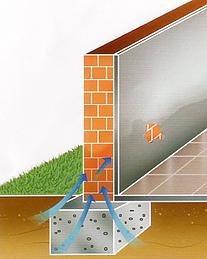
Rising damp (or also known as Salt Damp) in buildings occurs when (typically salty) ground moisture slowly rises up through the brickwork and mortar of a building by a capillary action.
In simple terms, the water rises up the wall of a building in the same way that a sponge will soak up the surrounding water by a sink or oil travels upwards through the wick of a lamp.
The moisture will continue to rise until it reaches a height where, unless no evaporation is possible, gravity takes over and pulls it down again. The moisture typically rises to not more than 1.5m from the ground.
Traditionally rising damp appears in houses older than 40 years old, though it can also appear in newer homes.
What causes Rising Damp?

Rising damp problems often occur as a result of not having a Damp Proof Course installed or having a Damp Proof Course that is faulty due to age or inadequate installation. It can also occur when the damp course level is bridged by earth, concrete or other masonry.
A Damp Proof Course is a waterproof layer in your wall (or both walls if you have a cavity wall), ideally about 15cm from the outside ground on your external walls and under your raised timber floor or near your concrete floor on your internal wall (so both DPC’s are on the same level). This layer repels water from rising up the wall.
How to identify Rising Damp?
In houses with rising damp, the following symptoms normally appear
Inside:
- Rotting window frames, skirting boards or floorboards
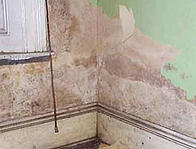
- White stains/tidemarks on walls through salt in water
- Bubbling or flaky plaster
- Wallpaper lifts / comes off
- Paint will not stick to the walls
- White powder or crystals appearing on the surface of the walls (efflorescence)
- Moist or wet patches appearing on the walls
- Bad, damp smell
- Mould growth on walls and furniture (but not exclusively – mould is also a product of poor room and/or sub-floor ventilation)
Outside:
- White powder or crystals appearing on the surface of the walls (efflorescence)
- Mortar frets and falls out between bricks and stonework.
- Stains appear
Step to Step Guide how to treating Rising Damp
The installation of a new damp course with Tech-Dry Damp Course Cream
into an existing brick or masonry wall stops rising damp. Here a step to step guid:
STEP 1Identify the rising damp which exhibits as:
For Internal Walls:
- Peeling & bubbling paint work
- Water tide mark or staining
- Presence of salt on walls
- Flaking plaster & render
- Rotting skirting & floor board
- Musty room smells
For External Walls:
- Fretted brickwork
- Water tide mark or staining
- Presence of efflorescence or sal
- Peeling & bubbling paintwork
- Crumbling bricks & missing mortar
STEP 2Internal: Carefully remove any skirting boards present to reveal the lowest mortar course just above the floor level.
External: Locate a mortar joint at a position normally 150mm above ground level, or just above floor level so both sides of the wall are evident.
Mark holes at approx. 80mm apart so that 3 holes should be drilled into the mortar bed of each length of brick of approx. 230 mm. Avoid drilling holes directly above the vertical mortar joints of brick walls.
STEP 3Set the drilling depth at about 10mm less than the wall thickness. Drill 12mm holes into the mortar bed using a hammer drill.
STEP 4Completely remove all the dust from the holes using a vacuum cleaner fit with a proper adapter that can suck the dust from inside of the holes.
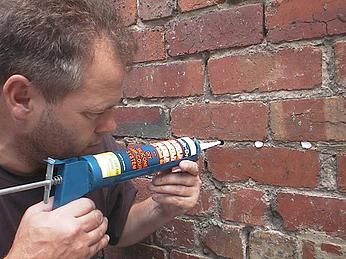
STEP 5Cut plastic tube to fit wall thickness and fit on end of nozzle of caulking tube.
STEP 6Inject DPC CREAM slowly into each hole using a standard caulking gun. Extend the nozzle of the gun to the rear of the hole and slowly withdraw the nozzle as the cream fills the hole. Fill fully and avoid any bubbles or hollows when filling.
Consumption: 12ml of the cream for a single brick wall (150ml per metre of single brick wall or 300ml per metre of double brick wall per fill).
AFTER TREATMENT:
After 24 hours the cream or fluid is absorbed and there should be a continuous horizontal absorption mark (wet mark) in the treated mortar and bricks above and below the treated mortar bed. If product does not penetrate the middle of two holes, repeat the process using the same holes. The treated wall may take several days to become a water repellent barrier.
Allow wall to dry out completely before further renovation is carried out i.e. 6 months before re-rendering.
For any further questions, contact us here at Tech-Dry!

